No license is required to run QForm UK 12 and view simulation results.
A license is required to run a simulation, create a new project, or modify the source data of an existing project.
Three types of licensing are available:
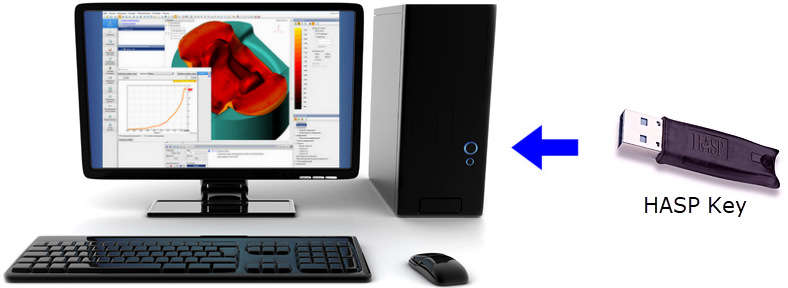
1. The license is stored on hardware HASP USB HL Key, which is inserted into the USB port of the user's computer.
2. The license is stored on software HASP SL Key, which is software installed on the user's computer.
3. Cloud license. Simulations are made on remote servers of Micas Simulations Ltd., and the user is given a special version of QForm UK Cloud, as well as - login and password to be able to perform simulations.
Local key (Time HASP Key, black) allows you to work with QForm UK only on the computer into whose USB port it is inserted. Network key (NetTime HASP Key, red) can be inserted into the USB port of any computer on the local network. QForm UK or at least the HASP Key drivers (HASPUserSetup.exe) have to be installed on it. Network key allows you to work with QForm UK on any computer on the local network. At the same time, the amount of computers on which you can simultaneously work with the program is limited by the license. Depending on the type of NetTime HASP Key a license can provide from one to 10 or from one to 50 seats in the local network.
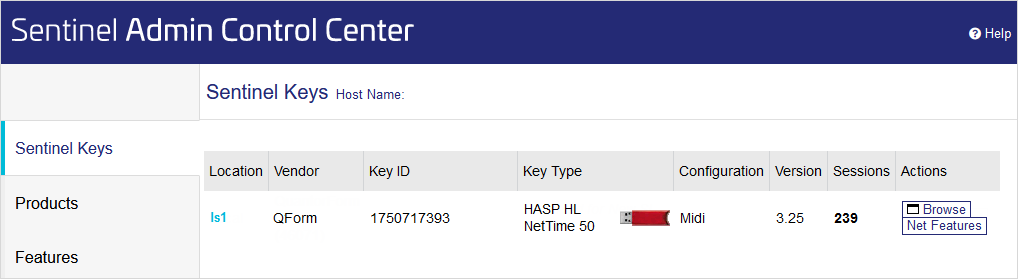
1.To install the USB key drivers, install QForm UK or HASPUserSetup.exe with Administrator rights: •if QForm UK is installed, HASPUserSetup.exe is located in the installation directory (C:\QForm UK\12.0.1\haspdrv\ by default) •if QForm UK not installed, HASPUserSetup.exe can be requested from the software vendor or downloaded from: https://supportportal.thalesgroup.com/csm?id=kb_search&query=runtime_packages%20GUI%20Windows. 2.Insert USB key into the computer's USB port. 3.To check the availability USB key follow this link: http://localhost:1947/_int_/devices.html (Internet connection is not required):
The browser window that opens displays the available HASP Keys, their type and additional technical info. Sometimes the requested page is not available. This is because the USB key driver has not been installed or has been damaged. In this case, you need to reinstall the USB key driver by running HASPUserSetup.exe. |
1. To install SL-key drivers, install QForm UK as an Administrator. 2. Follow this link: http://localhost:1947/_int_/devices.html (Internet connection is not required). If the page available, the drivers are successfully installed. Sometimes the requested page is not available. This is because the SL key drivers have not been successfully installed. In this case, you need to reinstall the drivers by running HASPUserSetup.exe: •if QForm UK is installed, HASPUserSetup.exe is located in the installation directory (C:\QForm UK\12.0.1\haspdrv\ by default) •if QForm UK not installed, HASPUserSetup.exe can be requested from the software vendor or downloaded from: https://supportportal.thalesgroup.com/csm?id=kb_search&query=runtime_packages%20GUI%20Windows. |
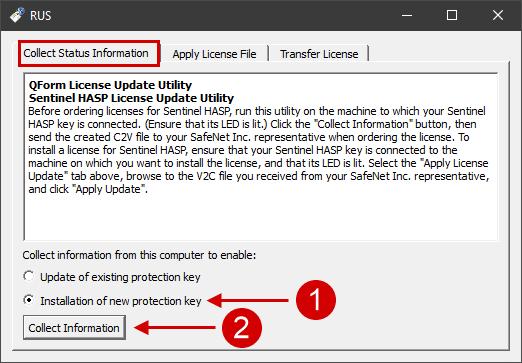
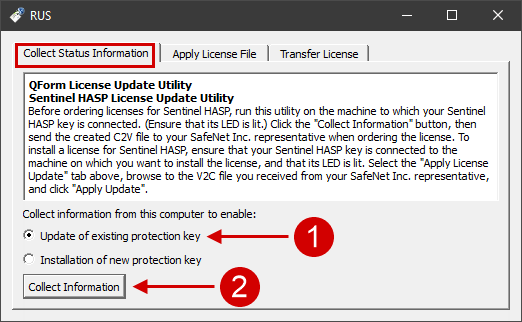
1. Run the application HaspRUS.exe (default: C:\QForm UK\12.0.1\haspdrv\) with Administrator rights. In the window that opens, in the Collect tab Status Select Installation of new protection key and press Collect Information:
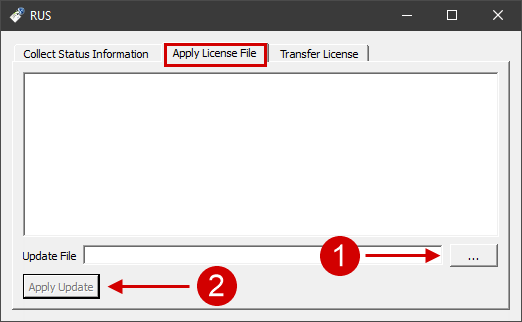
2. A C2V file will be created. 3. Send the created C2V file to the QForm UK distributor in your region or to Micas Simulations Ltd.. 4 . In response you will receive a V2C license file (the file can be packaged into a ZIP archive). 5. Run the application HaspRUS.exe (default: C:\QForm UK\12.0.1\haspdrv\) with Administrator rights. In the window that opens, select the tab Apply license file and activate the actual V2C file:
If "Vendor lib not found" message is displayed, copy haspvlib_46071.dll file from the directory C:\QForm UK\12.0.1\haspdrv\ to the directoryC:\Program Files (x86)\Common Files\Aladdin Shared\HASP\ and activate *.v2c file again. If the initial activation of the software SL key is preformed, make sure that a new SL keyis available after V2C file activation. To do this, follow the link: http://localhost:1947/_int_/devices.html:
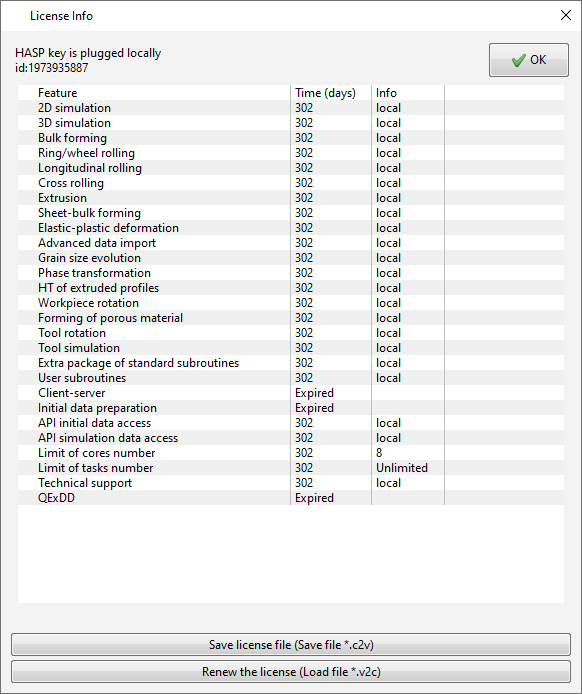
6. Run QForm UK and open the window License Info (Main window > Help > License). In case of successful license activation, this window will display the period of your license features.
|
||||

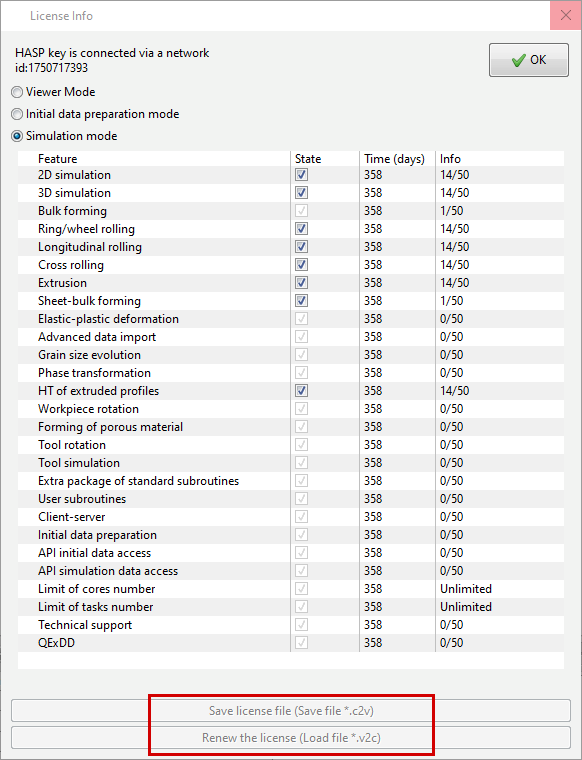
The license is managed using license files: •The *.c2v file (customer to vendor) contains information about the current license status; •The *.v2c file (vendor to customer) contains information to update the license byMicas Simulations Ltd.. To check the current license status, runQForm UKand open the License Info window (Main Menu > Help > License):
If there is no active license on the HASP Key, the License Info window opens automatically. If there are less than 15 days before the license expires, the License Info window opens automatically, but no more than once a day. The procedure for obtaining/renewing a license: 1. Save C2V file in the window License Info (you must create a new C2V file each time to obtain a license update); 2. Email the distributor of QForm UK in your region or to Micas Simulations Ltd.. The *.c2v file created must be attached to the letter. In case of use USB key you must specify its U-number; 3. In response, you will receive a *.v2c file with the appropriate license parameters (the file can be packaged in ZIP archive); 4. Activate *.v2c file in the License Info window.
Alternatively, you can update the license using the HaspRUS.exe (located by default in the C:\QForm UK\12.0.1\haspdrv\ directory, if QForm UK installed):
|
||||||||||
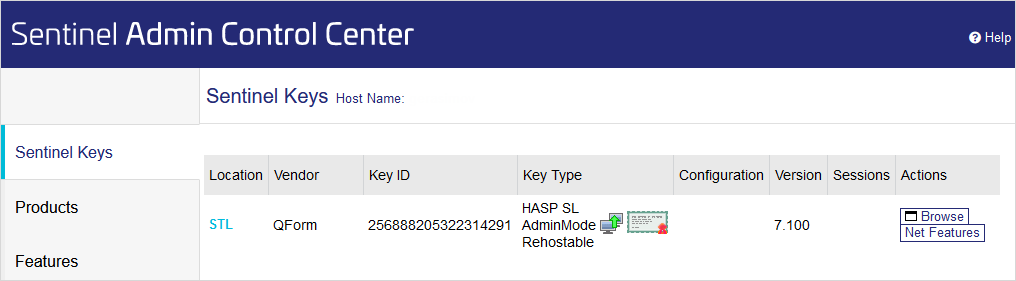
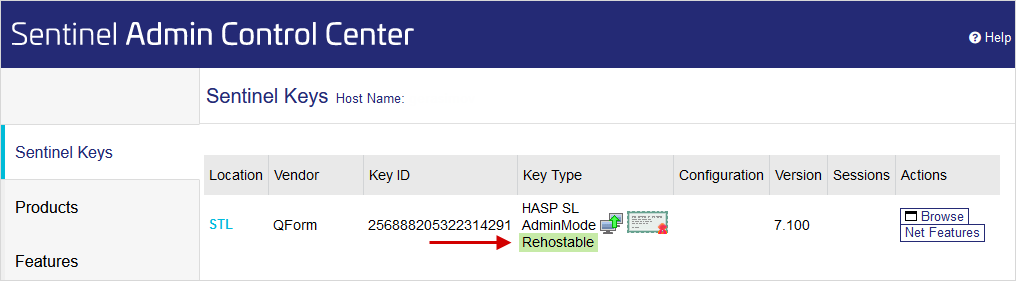
1. HaspRUS.exe file must be located on the source computer with the installed SL-key and on the destination computer to which the SL-key will be transferred. This file is located in the installed QForm UKdirectory (C:\QForm UK\12.0.1\haspdrv\). 2. The latest HASP Key driver (HaspUserSetup.exe) must be installed on both computers : •if QForm UK is installed, HASPUserSetup.exe is located in the installation directory (C:\QForm UK\12.0.1\haspdrv\ by default) •if QForm UK not installed, HASPUserSetup.exe can be requested from the software vendor or downloaded from: https://supportportal.thalesgroup.com/csm?id=kb_search&query=runtime_packages%20GUI%20Windows. 3. SentinelAdmincontrolCenter should be available on both computers via the link http://localhost:1947. If it's not available, try to reinstall HASPUserSetup.exe. 4. On the source computer, check that SL key can be transferred to another computer (such SL key called Rehostable). This can be checked at http://localhost:1947/_int_/devices.html:
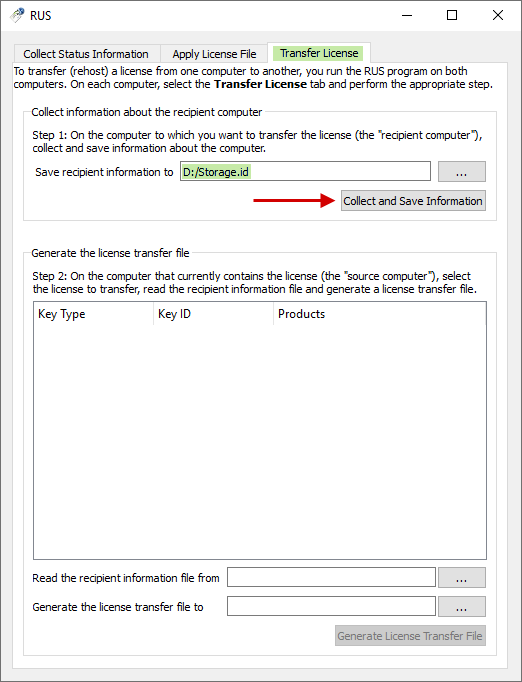
5. The haspvlib_46071.dll file must be located in the C:\Program Files (x86)\Common Files\Aladdin Shared\HASP\ directory on both computers. If it's not, copy it there from the C:\QForm UK\12.0.1\x64\ directory of the installed QForm UK. 6. On the recipient computer, run HaspRUS.exe with administrator rights and create an ID file in the Transfer license tab:
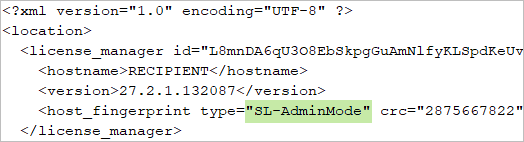
7. Open ID file in a text editor and make sure that it contains the SL-AdminMode line:
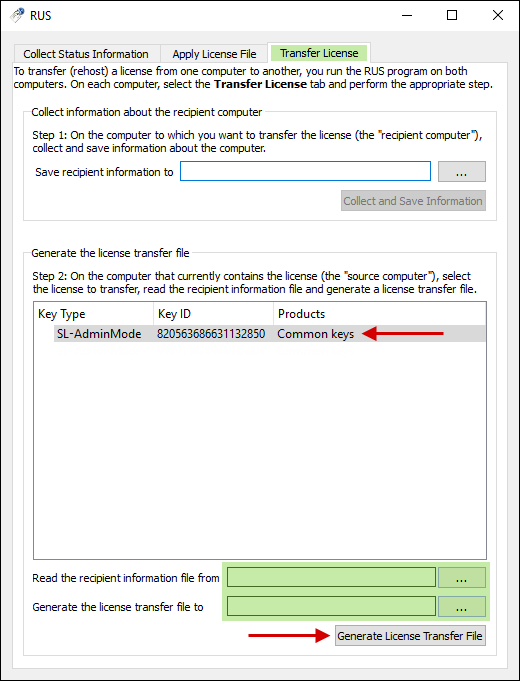
If not, then you do not have enough rights to get the SL key and you need to fix this. 8. After the ID file has been successfully generated, it must be sent to the source computer. 9. On the source computer, run HaspRUS.exe with administrator rights and create H2H file in the Transfer license tab. Requires you to specify the path to the ID file created on the recipient computer. After that, the created H2H file must be sent to the recipient computer.
10. On the recipient computer, run HaspRUS.exe and activate H2H file in the Apply License File tab. Make sure that SL key available on the receiving computer: http://localhost:1947/_int_/devices.html |
USB key is not tied to a specific computer and can be inserted into any other computer as needed. The existing license is stored on the key. For work key the latest dongle driver must be installed on another computer HaspUserSetup.exe if it hasn't been installed before: •if QForm UK is installed, HASPUserSetup.exe is located in the installation directory (C:\QForm UK\12.0.1\haspdrv\ by default) •if QForm UK not installed, HASPUserSetup.exe can be requested from the software vendor or downloaded from: https://supportportal.thalesgroup.com/csm?id=kb_search&query=runtime_packages%20GUI%20Windows. |
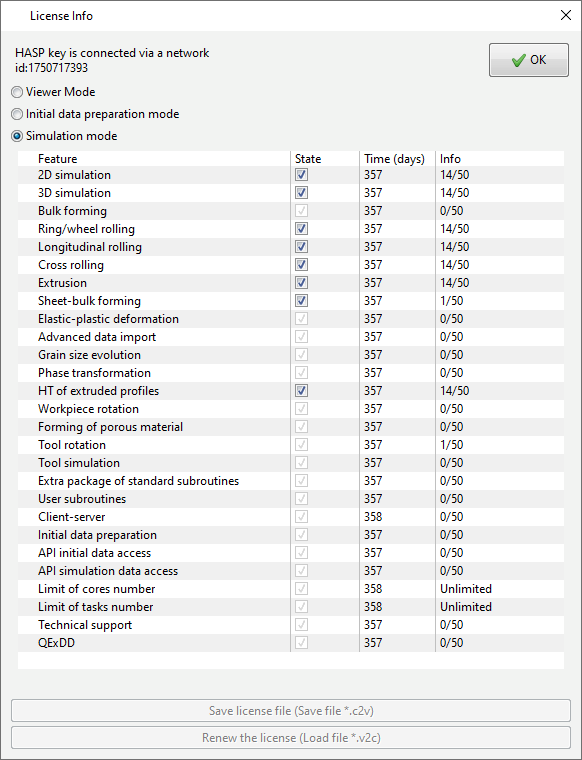
The License Info window (Main Menu > Help > License) displays the following information: •key connection type. If the key is installed on the same computer where it is opened QForm UK, then the key is connected locally. If a network key is used and it is installed on another computer in the local network, then the key is connected over the network •ID security key •expiration date of each license feature , number of days •in a column Info the following data is displayed: if the key is local (Time HASP Key), then opposite to each active license feature is written local, if the network key (NetTime HASP Key) is used, then the amount of used seats and the total amount of license seats are written opposite to each feature . The Limit of cores number feature displays how many CPU cores can be used simultaneously for simulation. The Limit of tasks number feature displays how many simulations can be simultaneously run on one working seat •in a column State you can selectively disable some license options if you use a network key
Each license options desctiption is presented in the table:
|
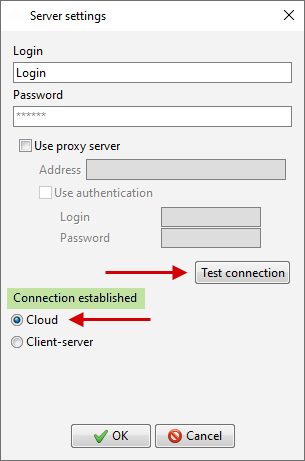
1. You need to install a special version QForm UK Cloud. To receive a link to the current distribution, send an email to distributor QForm UKin your area or Micas Simulations Ltd.. 2. Run the QForm UK Cloud and open the Server Settings window (Main Menu > Settings > Server Settings). Enter the Login and Password you received fromMicas Simulations Ltd. and click Verify Connection:
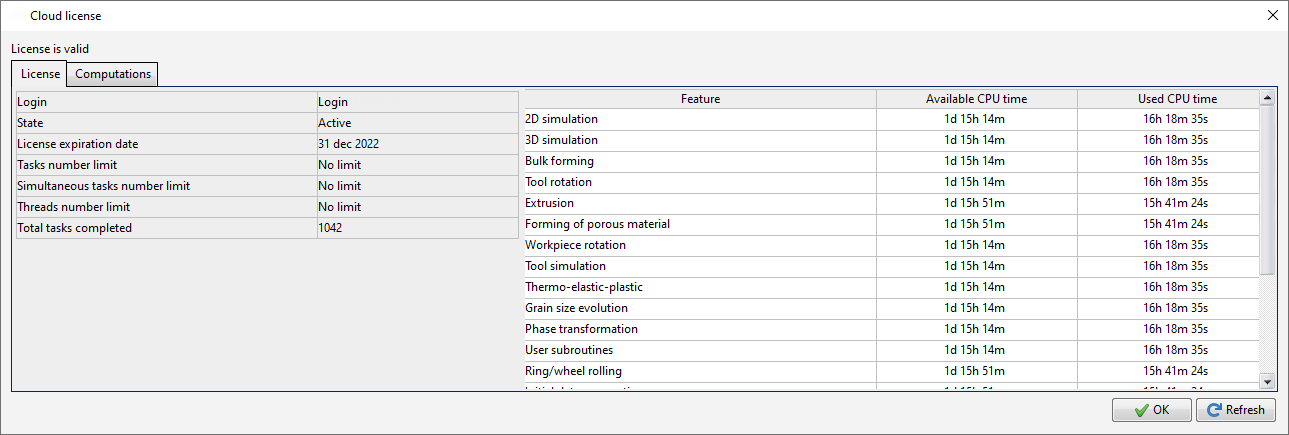
3. If successful, a message will appear Connection established . Click OK and get to work. You can check the license status information in the Cloud License window (Main Menu > Help > License). Here in the tab License there is info about available license options, license expiration date, available and used estimated time:
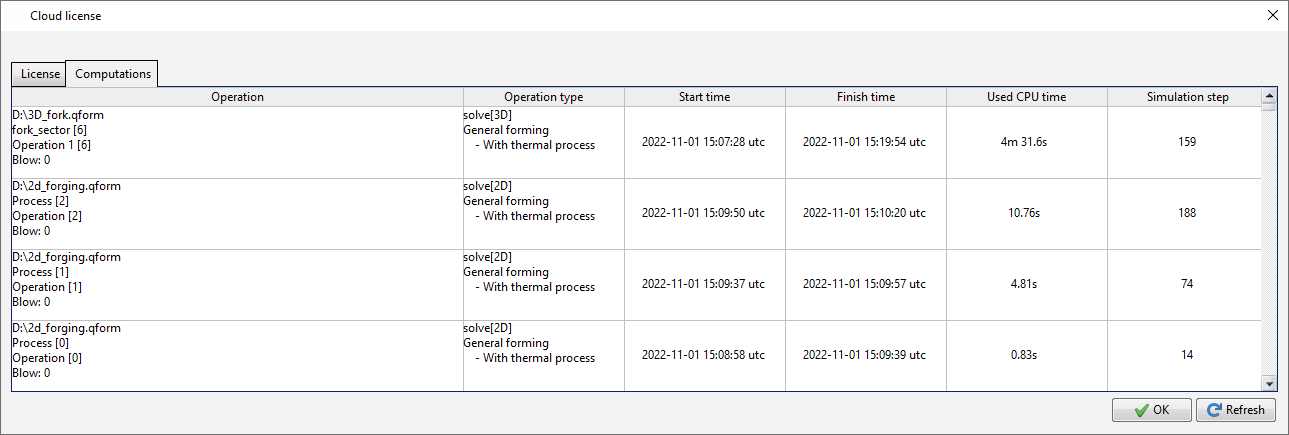
In the tab Computations there is info about all the computations made under the active login. It is displayed the info about the name and location of the calculated project, the type of the calculated operation, the start and solver finished, the amount of CPU time spent on the simulation, the number of the last simulation step. If the process consists of several operation, then the info will be displayed separately for each operation. If the simulated operation is multi-blow, then the info will be displayed separately for each simulated blow:
|
||||