Using the Positioning option, it is possible to position all objects, including Clipping surface, Boundary conditions domain, Body contours, and Adaptation domain.
The program implements two positioning modes: Simple and Advanced. Switching to positioning mode is carried out from the toolbar or using a key combination Ctrl+Space. Switching between positioning modes is also possible from the toolbar or using the keyboard shortcut. Ctrl + G
|
Information |
Positioning of workpieces, tools, and clipping surface (body contours) is possible only at the stage of preparing the initial data - at the zero step of simulation. Boundary condition domains and additional adaptation areas can be positioned at any simulation step. |
|

To position a specific object, you need to select it in the results window or in the object tree.
|
Information |
It is possible to change displacement of several objects at the same time. Selecting several objects is possible while holding Ctrl. When moving several objects at the same time, positioning is carried out according to the change in the position of the first object. |
|
Positioning is carried out using a grip. In each mode, you need to position the center of the grip and move or rotate selected objects relative to it.
|
A - displacement; B - center of the grip; C - rotation. |

To move the grip, it is necessary to select and move its center. If the Ctrl key is held down, the center is attached to the object's nodes.
|
|
|
|---|---|---|
Specifying the center of the grip |
|
Displacement the center of the grip to the lower tool node |


To move selected objects, pull the grip arrow, to rotate, turn the grip arc. In the input field, the distance in millimeters and the rotation angle in degrees are specified. To confirm the changes, click Confirm .
|
|
|
|---|---|---|
Displacement of the workpieces relative to a point on the lower tool along the OY axes by 35 mm |
|
Rotation of the workpieces relative to a point on the lower tool around axis by -90 ˚ |


|
Information |
For accurate movement and rotation of an object, the Up arrow and Down Arrow keys on the keyboard are available. These keys allow changing the position of the object with different step depending on its distance on the screen: If the object is far away, the positioning step is 10 units; At medium distance, the step is 1 unit; If the object is close, the step is reduced to 0.1 unit for the most accurate adjustment. |
|
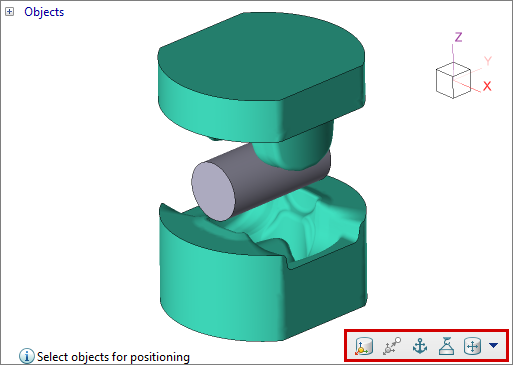
In the selected positioning mode, commands are available to interact with the grip. The command buttons are located in the lower right corner of the Results view window. Hints are displayed in the lower left corner. In the figure below, no objects are selected and the Select objects to position toolpit is displayed.
Displacement an object by specifying the start and final position of the gripSelect the object and position the grip's center as needed:
Then click on the button Pick grip end and position the center of the grip as needed:
Displacing an object along the selected grip axesSelect object and position the center of the grip as needed. Then click on the grip axis along which you want to move the object:
Click on the button Pick grip end and with the left mouse button set the movement direction. The selected object will move along the axes of the grip normal to the selected element.
|


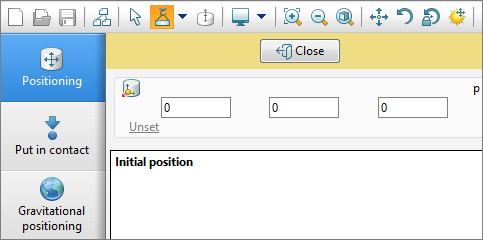
In the selected mode, the positioning panel is available, which contains the following tabs: Positioning, Put in contact and Gravitational positioning:
PositioningIn the advanced positioning mode, the following options are available: setting the grip's position by coordinates, or selecting from the menu to set the initial and final positions of the grip; choosing the grip's axis source and setting an additional axis direction; positioning history; commands for the simple positioning mode. The positioning panel replaces the initial data preparation tabs and consists of grouped commands:
Setting the start and end position of the gripAfter selecting an object, the positioning panel will display the coordinates of the position of the grip - by default, the start and end positions are the same:
To set the initial position, click on the upper field, which will be highlighted in green. The Initial position can be set in the following ways: by moving the grip center in the results viewing window, manually entering the coordinates of the grip's center, or by selecting from the menu to define the initial and final grip positions. In the menu, it is possible to choose the global zero or for a specific object, the local origin, node number, center of mass coordinates, axis origin, or the number of the traced point. In the figure below, the initial position setting mode is selected and the global zero is selected:
To set the final position of the grip, click on the bottom field. The final position can be set either by moving the grip center in the results view window, by entering the grip center coordinates manually, or by selecting from the menu. In the figure below, the final position setting mode is selected and a translation of 10 mm in the positive direction of the OX axis of the global coordinate system is set:
When specifying the final position, it is possible to change the direction and value of the displacement. Objects will visually move in the results view window. To confirm the movement, click Confirm or click on a space in the results viewing window. In the figure below, the movement is set to 20 mm and the movement direction is changed:
After the initial position of the grip is set, rotation of the object around a given axes is available. To rotation an object, click and rotate the arc of the grip. During rotation, it is possible to change the rotation axis and the value of the angle of rotation. In the figure below, a rotation angle of 40˚ around the OY axis is specified: Selecting the axis sourceHere the axes for the subsequent rotation of the selected object are set. The figure below provides a list of all available axes sources: Local axes ; Global axes ; Element normal , where the grip's center is set; Object 1 axis ; and Object 2 axis .
Let's consider an example of rotating the object around Axis 2:
To set an auxiliary rotation direction for the object, axis fixation is available, where one of the axes will be fixed:
Put in contactThe object selected in the Put in contact, is brought into contact with the object selected in the To object along a given axes. The sign indicates the direction for contact – along or against the axis. To put into contact, it is necessary to press the button Execute :
Gravitational positioningThe object selected in the Put in contact , is brought into contact with the object selected in the To object under the action of gravity. To put into contact, it is necessary to press the button Execute :
See also: |
||||||||||||||||||||||||||||||||||||||||||||||